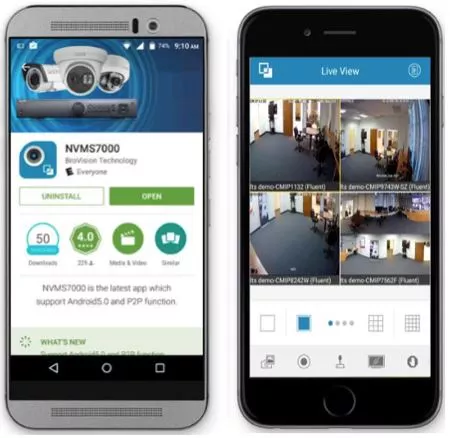
09 Aug How to View Your Cameras on your Smartphone
You have a sweet new high definition camera system installed, but now you want to know how to view your cameras on your smartphone. Follow these easy steps and you will be able know how to view your cameras on your smartphone through getting the app to see live video, view recordings, and more.
If this is your first time using this app, follow these steps to get set it up:
- Download the app NVMS700 from either Google Play or the iPhone App Store
- Open the app
- If asked, select Region
- It will then take you to the main screen
How to View Your Cameras on your Smartphone
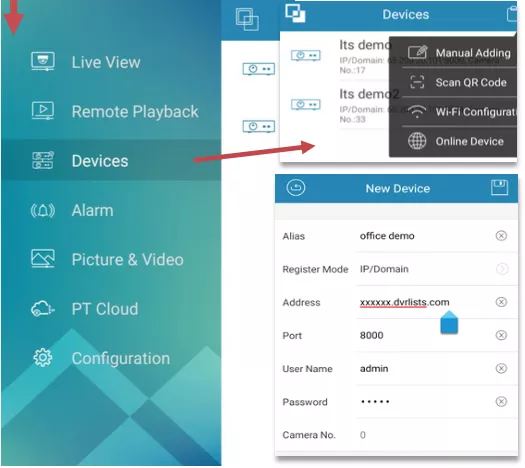
There are a few steps to adding your location on this NVMS7000 app. Here’s how you do it:
- Click on the icon (two squares) in the upper left corner. This will bring up the menu
- Then click on Devices
- Once you’re at Devices, click on the upper right clipboard plus icon, which pulls up a list or menu
- Then click on Manual Adding from the list
- Then enter the Login information:
- Alias: location Nickname (ex. house, work, living room, etc.),
- Register Mode: IP/Domain
- Address: Enter your IP Address or DVRlists Address
- Port: 8000 (port 8554 and 80 also need to be forwarded along with 8000 before you try to log into the recorder)
- User: admin (DVR username),
- Password: (DVR password)
- Click Save icon, then click on Start Live View at the bottom to see Live Video
User Manual
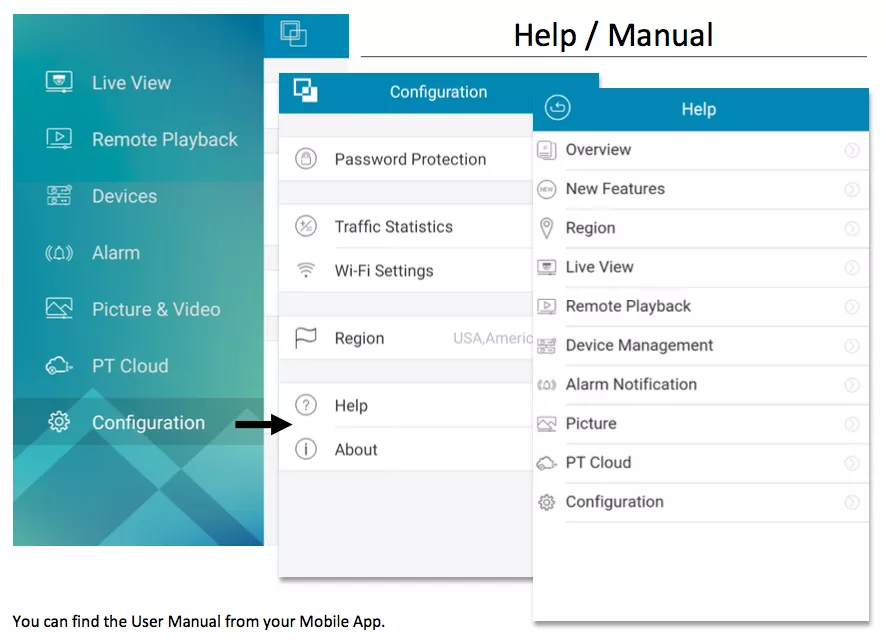
If you’re struggling with the app or have more questions, you can find the user manual in the app itself.
- Click on upper left icon to bring up menu
- Press Configuration
- Press Help, which will take you to the different sections of the manual
Remote Playback
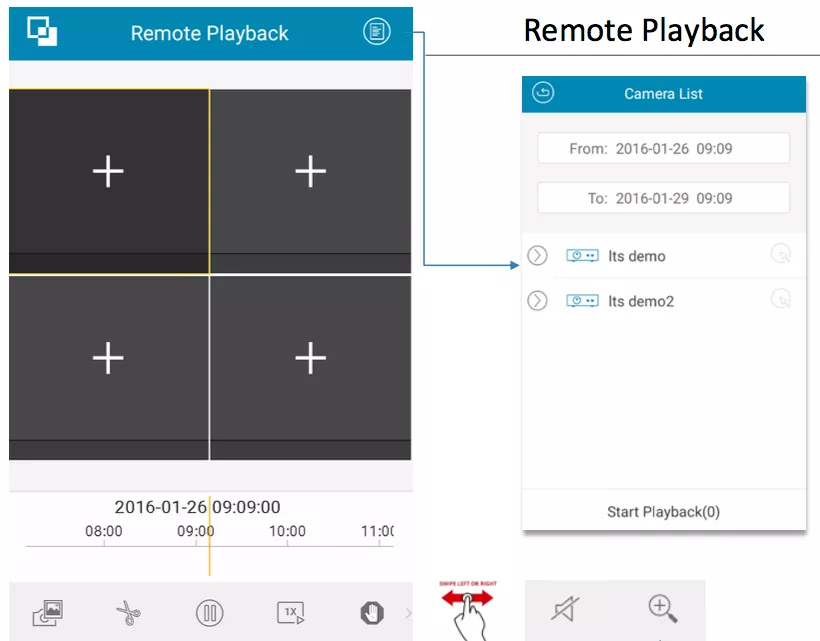
You can use remote playback to see what your cameras have seen from your phone. Here’s how to get to it.
- On the main screen, click on the logo icon in the upper left corner to bring up menu
- On the menu, click on remote playback
- Then click on the camera list icon in the upper right corner to bring up which cameras you’d like to see
- Choose the date and time frame you want to watch
- Click on the camera(s) you want to playback
This screen also gives you tools to view the playback including pause, screenshot an image, control speed, and recap a video. (include pics of remote playback buttons and tools)
Note: the recap video button is designed for a short moment backup. If you drag the timeline, it will cause the record to stop. And if you want to back up a long period of time, please use the PC to backup.
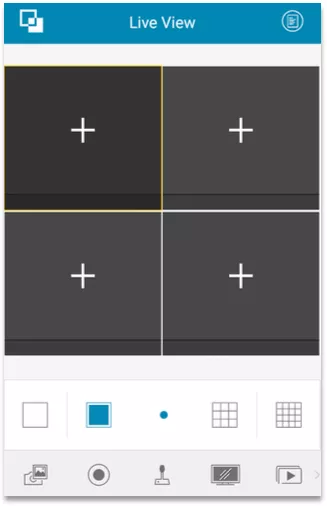
Live View
Live View can show you what’s currently going on with your cameras. Just click on the logo icon in the upper left corner to bring down the menu and then click on Live View.
If you have a PTZ camera, you can move the camera from your phone. Just click on the controller icon and it will let you move around just using your finger. It also gives you a few tools to help you out in viewing including cruise, zoom, focus, iris, and preset. The preset function helps you set where you want the camera look at certain times of the day.
If you have a motorized zoom camera, you can also use the PTZ control but you can only use the zoom feature.
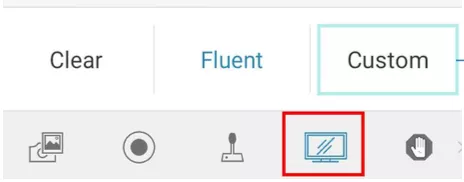
You can also change image quality by clicking on the screen icon down at the bottom. It then gives you some options. There are two defined image quality types provided: Clear and Fluent. The video by default comes in the Fluent, so if you want a clearer picture, click on Clear. You can also customize the image quality yourself.
Picture and Video
The Picture and Video section can help you view and manage the video files and pictures that you manually record and capture in Live View and Remote Playback. These files are stored in the directory of the SD card. And from here you can also share the pictures and videos to other apps.
To get to Picture and Video click on the logo icon in the upper left corner to bring down the menu. Then click on Picture & Video.
Select Camera List/Favorites
In order to select a camera list from favorites, here are the following steps.
- Make sure you’re in Live View. To get to live View, click on the upper left icon to bring up the main menu and then click on Live View
- Click on the icon in the upper right corner to bring down a menu.
- Click on Camera List
- Select or de-select the camera from the list
- Save currently selected camera to become as a favorite group by pressing folder icon in the lower right corner
Useful tips
- The most the channel can handle is up to 16CH, so save 1-16 and 17-32 as two favorite groups. This lets you switch from one to the other easily.
- Save multiple IP Cameras to be one favorite group
- For slow internet speed connection, use Favorite to reduce camera connections
Alarm
This is a new feature that can let you enable alarms from your phone. But in order to use this feature, your camera/DVR/NVR must enable the Motion Detect or VCA function, and the Notify Surveillance Center section must be enabled.
To get to Alarms, just click on the upper left logo icon to bring down the menu and then click on Alarm.
No Comments